Showing posts with label Card Games. Show all posts

Wednesday, July 8, 2015

Books I Will Use to Make Games

I went through my cutting box and found some great books in there. Here are three books that will make some fun learning games. 


BOOK 1:


This is one I found in a FREE box at a garage. Because all of the stickers have been already placed on the fold-out mural I assume the people felt it was no longer of value. But, I assure you, I quickly grabbed it!
 

The stickers are reusable so I will be able to remove them from the mural.


The back of each section of the mural has a picture of the animal and a brief bit of information that I may be able to use as I create a game using this book. Also thinking I may copy this information and picture and put it on game cards. Purpose??? Not sure yet.


BOOK 2:


Not sure where I got this one, but likely a garage sale. This is loaded with wonderful pictures and tons of information. 


As you can see the pictures are bright and colorful and all the birds are clearly identified. There are several pages similar to this one.


This page of pictures of the eggs of different birds should make an interesting addition to a game. A possibility I think of as I type is these could be used as the spaces on a board game. 


This awesome page with the sketches of the beaks/bills and feet of different types of birds will be a great addition to a game. It actually could be two different sorting type games.  We could use pictures from the book on cards and sort into pockets according to the beak/bill or feet. These kinds of activities get the children thinking. It is less about "right" answers and more about having them use their eyes and reasoning skills. 


Book 3:  

This book also has reusable stickers which will make some nice addition to game boards or cards.


As you can see, the layouts are awesome! There are ones for several different habitats. I will probably use these as the game boards.  I will simply mount them on the file folders to make them more durable. 

I hope this gives a bit of an idea of why I collect books to put into my cutting box. These books will be played with over and over once they become games and they will provide much learning fun.  

Thursday, April 2, 2015

7 Sevens


7 Sevens is a fun game the whole family can play. 

Children get practice with addition facts to 6+6 and recognizing numerals. They also learn to take turns and keep good attitudes while playing.

Grandsons Jacob, 8, and Aaron, almost 6, came for a visit and since we rarely have time with just us, we played some games. 


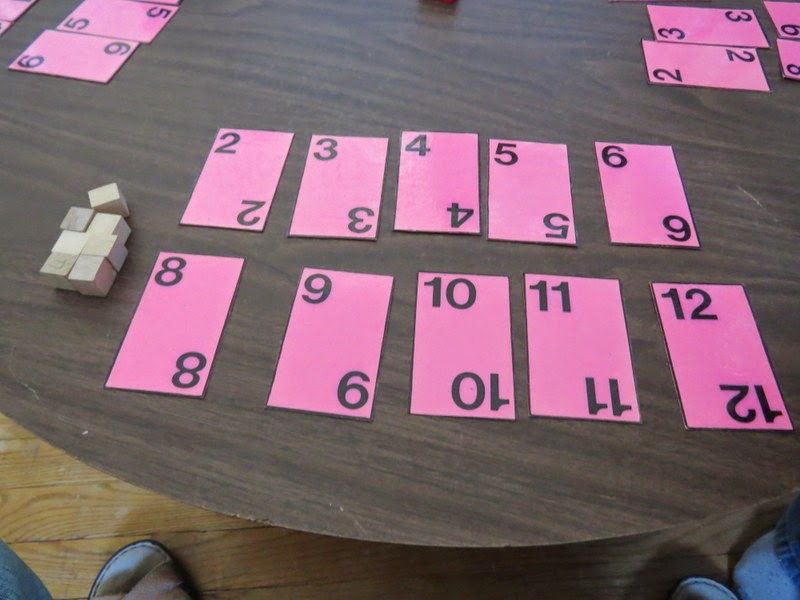
7 Sevens is a favorite game of all the children. We play it in many different fashions. Today we used number cards and counters. Each player gets a set of cards numbered 2-12 and 7 counters. 


The cards are placed in front of each player so they are visible to all. The counters are set to one side.


Two die are needed. I prefer to use numbered die rather than the ones that have the dots. The dots can be good for beginning players so they can use the dots as a visual for adding. However, these boys know or almost know the addition facts and just need more practice. Here a player rolled 2+2 which equals 4.


Since he rolled a four, he turns over his four card and the play moves to the next player.

The next roll...

...is 7 and this is the FUN part. Rolling a 7 costs the player one of his counters. 

Play continues with each player taking turns rolling the dice and turning over the appropriate card or losing one of his counters. If a player has already turned the needed card over, he simply passes the dice to the next player.


When a player rolls a 7 and has to give up his last counter he is out of the game.

Poor Jacob. 
 But the game continues for Aaron and I....

Who WINS? The first player to successfully turn over all his cards. This can be difficult because some of the numbers are harder to get. OR the winner is the last player in the game when other players have lost all their counters.

However...Grandma always wins in that I get to have a fun time with the children. Also they get some addition practice and they don't even realize they are "doing school." ....but don't tell them. 

Tuesday, September 10, 2013

Go Fish Roman Numerals

Now we used the cards with the cute little fish on them for the game they were intended...GO FISH!

 Here is Diana's hand. She had asked Douglas for a 3 and received one. So she had her first match.

 Wesley is asking for a card. We played that if you were holding the Roman Numeral card you could simple state the number you needed to make the match. However, if you were holding the number and wanted a Roman Numeral you had to state how it would appear using I, V and X's. For example, Wesley requested XII since he had the 12 card in his hand.

Of course, the fun comes if the person does not have the card you request and says, "Go Fish!" Then you get to draw from the pond of cards in the center of play.
Douglas played with Wesley and Diana. We had a fun time.

Roman Numeral Search

We call it SEARCH, but this game is known by other names, as well....Concentration and Memory.

 We began with only 10 cards - the 1 - 5 and their Roman Numeral matches.

 Ladies first...so Diana started and selected two cards which were not a match.

 Wesley went next and made a match with the 5.

 Later Diana made her first match.

Then we tried the game with all 24 cards (1-12 and the matching Roman Numerals).
 We put the numbers to one side and the Roman Numerals to the other in an attempt to make it a little easier for Diana.
 You can see she is a little overwhelmed with the number of cards.

So...Douglas stepped in and took her place.

 Douglas matches the 8.
Wesley matches the 3.

It was a much better game and the boys both enjoyed it. Wesley got more practice.

Roman Numeral Match

We introduced Diana,4, to Roman Numerals today. She caught on fairly quickly. Wesley needed the quick review and he remembered them all.

The Cards

The cards were made to be played for a Go Fish game, which is why the cute little fish is on each card. The deck consists of 24 cards: 1 - 12 in both Roman and Arabic numerals.

 First we set out the 1-12 cards. The Roman Numeral cards were shuffled and up in a stack. Diana drew cards and handed them to Wesley to place above the correct number.


 Wesley would state the number as he placed the Roman Numeral cards. He would also explain each card/number to Diana. This gave him good review and continued Diana's introduction to Roman Numerals.


 Activity finished...

Now Diana gets a turn.
 Wesley handed her one card at a time and she place the number below the correct Roman Numeral. This was quite easy, but it gave her some confidence.

Next we did the first activity again with both children taking turns.
 Diana was excited to get one she knew.
...and she knew right where to put it.

We had fun. Wesley got some good review and Diana got her first introduction to Roman Numerals.

Monday, September 9, 2013

Doubles Addition Cupcakes

"Cupcakes" is in the name simply because of the fun cards we used. The children enjoyed drilling simple addition doubles facts.


The Cards

Made from bulletin board strips...
 The strips had cupcakes in several colors. I cut them apart and have saved them for quick use for games. Today I used the purple ones I had left. On the back I wrote the addition facts for the doubles from 0 + 0 =  to 14 + 14 =.  I did them both in vertical and horizontal form. I did to 14 simply because that was the number of cards that I had.

Introducing the Cards

First we did a little activity. I set out the 0 + 0 =  cards. I showed them two empty spots. I asked how many counters we would have if we combined/added the two empty spots. ZERO, of course, was the answer. Next they each put 1 counter in each space. I asked how many we would have if we added 1 + 1 and they shouted TWO.  We continued adding one counter to each pile and stating the new addition fact. Wesley, age 6, knows many of them, but soon realized that the answers were counting by TWO and so he predicted what the next answer would be. This was a great discovery for him to make and one I had not planned.

We finished going through all the cards (facts to 14 + 14 =) just so Wesley could see that his predictions continue. Then we got down to drilling some of the facts. We used only the first six facts (up to 5 + 5 =) to now play some games. Even though the first things we did were not REAL games, by calling the such, the children excitedly played. (They thought of it as play, because, after all, I was calling it a game.)

First I gave them each a set. Wesley had the horizontal form and Diana, 4, had the vertical. They laid them out in front of themselves and we drilled the facts in any way I could think of.

1. I placed them in order and drilled them each through their cards. They would read the fact and give the answer.

2. Next, I skipped around, pointing to cards out of order. They again read the facts and gave the answer.

3. I mixed up their cards and they stated only the answers to each fact.

 Here Diana is giving the answers to her fact cards. While Wesley finds his matching card.

Next we played some REAL GAMES.

Game 1 Since Diana is two years younger I started with One At a Time Take. For this game I shuffled all the cards. I held up one card at a time and they took turns giving the answer. If they answered correctly, they got to collect the cupcake. (Calling them "cupcakes" instead of cards, just makes it more fun.) If they gave an incorrect response, the other person got to give an answer and collect the card. We did this several times until they were both doing it pretty rapidly.

Game 2 I called this Speed Cupcake Take. This time when I held up the card both Wesley and Diana tried to be the first to give the answer. Wesley won the first two cards and Diana was getting discouraged, but I reminder her that she knew these now and if they tied, she would win the card. She sat back up and won the next card, mostly because Wesley wasn't paying attention...but she was so excited. She tied him a couple times and ended up with 5 of the 12 cards. However, before Wesley could count them and declare he had beat her, I swept up the cards and shuffled them and said, "Let's go again." The second game she got 7 of the cards, but again I tried not to make a big deal about a "winner." Because, if you have a winner, there must be a loser...and no one wants to be the loser.

We had fun with this quickly made game and the children are memorizing these facts. Tomorrow we will do them again and probably add one or two more fact cards.

Games make drilling so much fun. Flash cards could be used, but making the "pretty" cupcake cards and calling it a GAME, made it much more fun.


Saturday, August 31, 2013

Phonics Blends OH NUTS!

OH NUTS! is one of our favorite games to play. We use it for so many skills. All of the children, regardless of age, enjoy OH NUTS!

The Cards:
Using a bulletin board border strip, I covered the front side with clear Contact paper to make the cards more durable. I then cut the sections apart. I have used some of these cards for other activities like counting, addition, and patterns. The backsides were left plain and uncovered so they were already to be used to make this game.

Wesley and Diana are both working on these types of blends. We use ABeka for phonics. The Handbook and their Letters and Sounds books have them reading these type blends. They both will benefit from more practice with these.

Of course, to really make this a fun game we needed to add OH NUTS! cards.

For some of the other OH NUTS! games I made, I drew a cute little peanut around the words. But I was making this game up quickly while they were doing some of their other work. I make about 1/3 of the cards in the deck be OH NUTS! cards. This amount has made the games work well for us.

 To Play:
The cards were shuffled and placed in the center of the table. In turn, players draw cards and read the blends.

Wesley correctly reads his first draw. Now he has a choice to make. He can keep this card and move it to his SAFE pile and end his turn or he may draw again.  IF he draws again and gets an OH NUTS! card he forfeits all the cards he has collected on this turn. (Once cards are placed in the SAFE pile, they are protected for the rest of the game.)

Wesley decides to draw again and gets another blend card which he correctly reads. If he had incorrectly read the card his turn would also end and he would have to return all the cards collected on this turn. However, we play with a little help allowed since Wesley is struggling a little with identifying the long and short vowels. So for today, as this was our first time playing, if they made a mistake, I pointed out the correct vowel sound and let them try again without penalty. One of the greatest things about games is the way rules may be bent. We bend rules for younger children, new skills being learned, or just because...just because we want to try something different.

After Wesley reads his card, he decides to go again. He is lucky and drew another blend card.

Even though I cautioned him that an OH NUTS! card was likely coming up soon, he decides to draw again.

He was lucky and got another good card which he read. He then decided to move all his cards to his SAFE pile. It was then Diana's turn. The very first card she turned up was an OH NUTS! card. Wesley had made a good choice. Diana collected no cards on this turn and Wesley got to play again.

Now it is later in the game....
 Diana already has a few cards in her SAFE pile, but she doesn't like to quit as this group of pictures will show.

 After her first draw and correct reading, she decides to go again....

 and again...

and again...
OOOOPS!.... OH NUTS!  Turn over. Cards lost.

But we had lots of fun and laughs. AND...the kids got lots of practice reading their blends. They wanted to play again even though neither one of them had collected many cards. I think they missed a bit of the idea of the game. Their older brothers were watching and kept encouraging them to quit after getting a couple cards, but they just kept wanting to draw again.

Oh well. They had fun and the REAL purpose of the game was accomplished ....they drilled their blends.

Storage:
I store card games I make in Ziplock baggies. Some of these are kept in boxes on a shelf  - for current skills. Others are hung on a pegboard in a nearby closet.

To see other OH NUTS! card games we enjoy.