Playing Cards
I choose a 16 square grid so there would not be an over abundance of information facing the player.
I was sure to include similar answers - such as 24" and 24 sq. in. I want them to understand the need for careful labeling of answers. I was also able to make sure they are acquainted with abbreviations. Any number of playing cards can be created, just making the responses in different locations. Remember not all problems will have a solution on each card.
Calling Cards
Here I drew pictures of the geometric shapes and gave the needs dimension. I wrote AREA or PERIMETER at the bottom of each card.
I have the players keep a piece of paper handy for any calculations that may be necessary.
I should have included a little number in a bottom corner of each calling card so that I could include an answer key. In that way I would not always have to be a part of the game.
SOLITAIRE PLAY is possible. Have the player select a card and then give them the assignment of finding a particular BINGO. For example, ask them to find the calling cards to make a BINGO across the top. They can simply use the calling card to cover the space as they find the right one. They may have to work through several additional calling cards before they find the ones needed.
Click to see other BINGO GAMES
Showing posts with label Math. Show all posts
Monday, March 21, 2016
Thursday, March 17, 2016
Bingo Games 3 - Count 'Em Bingo & a BONUS TIP
Count 'em Bingo
Calling Cards - By gridding out a sheet and making all the cards together it is much faster to cover with clear Contact paper or laminate. Then quick to cut apart.
The pictures were cut from a simple math page in one of those workbooks for children you can buy most anywhere...but don't forget the best spot to find these is FREE boxes at rummage sales.
Playing Cards - Use a simple grid. Here I used only 16 spaces because I wanted more room. Write the needed numbers in a mixed up order. Not every card will have each number. I added a little picture (from the same book) to each playing card just to make them look nicer. Besides sometimes it is the picture that captures the child and it will become their "favorite" card.
SPECIAL TIP - One of the most frustrating things for little ones when they play BINGO is bumping their playing card and messing it all up. SO....here is an easy solution.
Make up a plastic sleeve with pieces of velcro strategically placed so they will be in each section of the grid. You can see from the next two pictures what this looks like.
Rather than cover or laminate the playing cards, they will be placed in plastic sleeves (page protectors). The Velcro is on the outside. In this way you can use the sleeves for all your BINGO games. Since I have several different grids I use (9 spaces - 25 spaces) I have made these plastic sleeves to match each size and spacing.
As you can see, the Velcro is placed to match up with each BINGO space.
I have used the matching Velcro pieces on small poker-like chips so they can be used as markers.
TIP You do not need to make dozens of these plastic sleeves with Velcro. Just make one for each type of grid you may use. Unless, of course, you have multiple young players that may need this added help.
Now you can use these for any BINGO games you may make. Since I now put all my BINGO playing cards in plastic sleeves, it is quick and easy to take one out and put it in one of these special sleeves if it is needed or wanted by a player.
Tuesday, July 14, 2015
Wilbur - A Favorite Learning Tool
Remember Wilbur of "Charlotte's Web" fame?
Wilbur is a most versatile format and a favorite of young children.
Turn an old bleach bottle into a "funtastic" learning tool!
Draw eyes and a mouth with permanent markers.
Add pink felt ears and a pipe cleaner tail.
Use egg carton sections for feet.
Decorate sides as desired.
Cut a slit about 1/4 inch wide across his head, just behind his ears.
These were the old instructions for making Wilbur and I have made many this way. But, like everything else, he got an update.
This is the original very first Wilbur after his many face-lifts. This guy is around 30 years old. Looks pretty good for his age I think. The permanent marker needs a new paint job every few years to keep it bright. The tail has been replaced a few times and the ears have had to be reattached.
The biggest improvement is his feet. There has been much trial and error with these. Egg cartons just glued like in the first picture was the start. Different glues were tried. Later, stones were added to give extra weight and help with balance. The stones are important, be sure to add some to each egg carton section. Finally,one day I just grabbed the good old duct tape and covered it all. Finally, a good solid base that has held up for a couple years. The next improvement will be to look for a color different than the yellow and make it more to my liking. But the key is that he now works, is stable, and has held up for some time.
Here is Wilbur in action:
With a stack of skill cards placed in the slot, Wilbur is ready to teach. For these cards, Charlotte counted the items and stated the number.
To view the answer, the child removes the bottle cap and peers inside.
Charlotte removed the cap and looked inside to see the answer revealed. If she is correct, she simply takes the card out and another is already in place. NOTE: Children enjoy removing the cap, so I suggest they put it back on before they change the card.
Here is what she saw when she looked inside.
The cards should measure about 5 inches by 8 inches.
Put the "skill" at the top edge of the card.
The correct answer should be at the bottom center of the card.
Here are a few examples of the many possible skills that can be put on cards.
Douglas was beginning to read and we made these card for him to recognize his name and the names of those most important to him.
Beginning letter sounds
Beginning blends and diagraphs
Fill in the missing vowel
Read the number words
Addition
Multiplication
States and Capitals - notice this set was written by one of the children. Having them make the cards is just another step for them to be learning the skill.
Questions to review a unit on bees.
Wilbur is enjoyed by ALL ages and I guarantee when you put him out with some cards, EVERYONE will have to remove the cap and take a look.
Hope Wilbur is loved at your house as much as he is at ours.
Thursday, April 2, 2015
7 Sevens
7 Sevens is a fun game the whole family can play.
Children get practice with addition facts to 6+6 and recognizing numerals. They also learn to take turns and keep good attitudes while playing.
Grandsons Jacob, 8, and Aaron, almost 6, came for a visit and since we rarely have time with just us, we played some games.
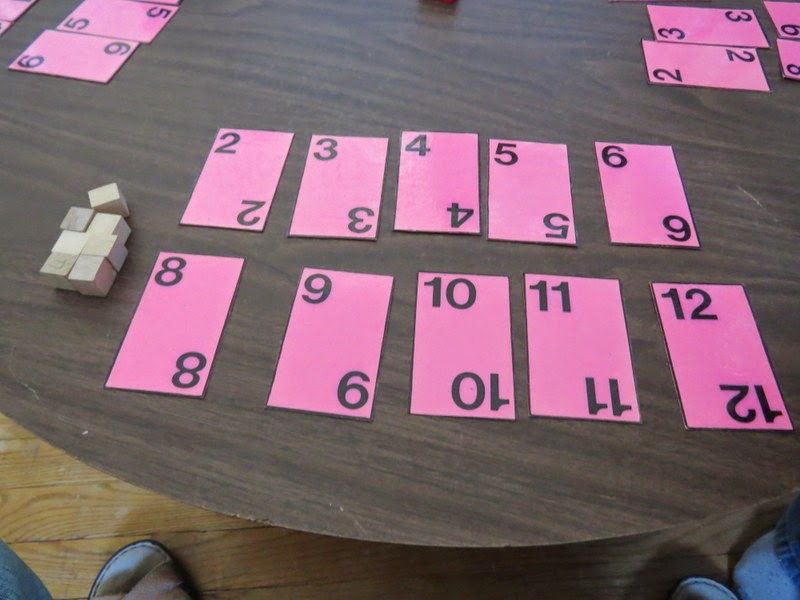
7 Sevens is a favorite game of all the children. We play it in many different fashions. Today we used number cards and counters. Each player gets a set of cards numbered 2-12 and 7 counters.
The cards are placed in front of each player so they are visible to all. The counters are set to one side.
Two die are needed. I prefer to use numbered die rather than the ones that have the dots. The dots can be good for beginning players so they can use the dots as a visual for adding. However, these boys know or almost know the addition facts and just need more practice. Here a player rolled 2+2 which equals 4.
Since he rolled a four, he turns over his four card and the play moves to the next player.
The next roll...
...is 7 and this is the FUN part. Rolling a 7 costs the player one of his counters.
Play continues with each player taking turns rolling the dice and turning over the appropriate card or losing one of his counters. If a player has already turned the needed card over, he simply passes the dice to the next player.
When a player rolls a 7 and has to give up his last counter he is out of the game.
Poor Jacob.
But the game continues for Aaron and I....Who WINS? The first player to successfully turn over all his cards. This can be difficult because some of the numbers are harder to get. OR the winner is the last player in the game when other players have lost all their counters.
However...Grandma always wins in that I get to have a fun time with the children. Also they get some addition practice and they don't even realize they are "doing school." ....but don't tell them.
Sunday, September 15, 2013
Piggy Bank Coin Bingo
Bingo is a fun game that different ages can play together and all learn together.
March 7, 2013
All four of the children are able to play this game together. It is good review for the older boys and they just love to play. Wesley 6, is learning to count coins and Diana 4, is learning to identify the different coins and also to reading double-digit numbers.The Playing Cards
I drew the pig on white paper and added the blank circles. Then I Xeroxed the pig on several different colors of card stock. The amounts were then written in on the cards so that every card was a little different from the others. Then I covered the cards with clear Contact paper to make them more durable. They could also be laminated or placed in plastic sleeves.
The Calling Cards
I used coin stamps and put different combinations on these cards. Because Diana is just learning the different coins, we added real coins to our game. I would match the card so she could clearly understand what coins we were using. We helped Wesley (who needed this concept the most) count the coins after Diana had identified them.
The Play
Plays exactly like traditional bingo. Once the amount on the calling card has been counted, all players look to their cards to find the matching amount. If they have the amount, they use a poker chip to cover the space.
NOTE: Even young children who cannot yet read the numbers can play with a little help. They enjoy being a part of the game and covering up the spaces on their cards.
The Winner
The player who is the first to cover all the spaces on their card.
Even though Diana was the youngest and unable to count the coins yet, she is able to be the winner of the game.
Tuesday, September 10, 2013
Go Fish Roman Numerals
Now we used the cards with the cute little fish on them for the game they were intended...GO FISH!
Here is Diana's hand. She had asked Douglas for a 3 and received one. So she had her first match.
Wesley is asking for a card. We played that if you were holding the Roman Numeral card you could simple state the number you needed to make the match. However, if you were holding the number and wanted a Roman Numeral you had to state how it would appear using I, V and X's. For example, Wesley requested XII since he had the 12 card in his hand.
Of course, the fun comes if the person does not have the card you request and says, "Go Fish!" Then you get to draw from the pond of cards in the center of play.
Douglas played with Wesley and Diana. We had a fun time.
Here is Diana's hand. She had asked Douglas for a 3 and received one. So she had her first match.
Wesley is asking for a card. We played that if you were holding the Roman Numeral card you could simple state the number you needed to make the match. However, if you were holding the number and wanted a Roman Numeral you had to state how it would appear using I, V and X's. For example, Wesley requested XII since he had the 12 card in his hand.
Of course, the fun comes if the person does not have the card you request and says, "Go Fish!" Then you get to draw from the pond of cards in the center of play.
Douglas played with Wesley and Diana. We had a fun time.
Roman Numeral Search
We call it SEARCH, but this game is known by other names, as well....Concentration and Memory.
We began with only 10 cards - the 1 - 5 and their Roman Numeral matches.
Ladies first...so Diana started and selected two cards which were not a match.
Wesley went next and made a match with the 5.
Later Diana made her first match.
Then we tried the game with all 24 cards (1-12 and the matching Roman Numerals).
We put the numbers to one side and the Roman Numerals to the other in an attempt to make it a little easier for Diana.
You can see she is a little overwhelmed with the number of cards.
So...Douglas stepped in and took her place.
Douglas matches the 8.
Wesley matches the 3.
It was a much better game and the boys both enjoyed it. Wesley got more practice.
We began with only 10 cards - the 1 - 5 and their Roman Numeral matches.
Ladies first...so Diana started and selected two cards which were not a match.
Wesley went next and made a match with the 5.
Later Diana made her first match.
Then we tried the game with all 24 cards (1-12 and the matching Roman Numerals).
We put the numbers to one side and the Roman Numerals to the other in an attempt to make it a little easier for Diana.
You can see she is a little overwhelmed with the number of cards.
So...Douglas stepped in and took her place.
Douglas matches the 8.
Wesley matches the 3.
It was a much better game and the boys both enjoyed it. Wesley got more practice.
Roman Numeral Match
We introduced Diana,4, to Roman Numerals today. She caught on fairly quickly. Wesley needed the quick review and he remembered them all.
The Cards
The cards were made to be played for a Go Fish game, which is why the cute little fish is on each card. The deck consists of 24 cards: 1 - 12 in both Roman and Arabic numerals.
First we set out the 1-12 cards. The Roman Numeral cards were shuffled and up in a stack. Diana drew cards and handed them to Wesley to place above the correct number.
Wesley would state the number as he placed the Roman Numeral cards. He would also explain each card/number to Diana. This gave him good review and continued Diana's introduction to Roman Numerals.
Activity finished...
Now Diana gets a turn.
Wesley handed her one card at a time and she place the number below the correct Roman Numeral. This was quite easy, but it gave her some confidence.
Next we did the first activity again with both children taking turns.
Diana was excited to get one she knew.
...and she knew right where to put it.
We had fun. Wesley got some good review and Diana got her first introduction to Roman Numerals.
The Cards
The cards were made to be played for a Go Fish game, which is why the cute little fish is on each card. The deck consists of 24 cards: 1 - 12 in both Roman and Arabic numerals.
First we set out the 1-12 cards. The Roman Numeral cards were shuffled and up in a stack. Diana drew cards and handed them to Wesley to place above the correct number.
Wesley would state the number as he placed the Roman Numeral cards. He would also explain each card/number to Diana. This gave him good review and continued Diana's introduction to Roman Numerals.
Activity finished...
Now Diana gets a turn.
Wesley handed her one card at a time and she place the number below the correct Roman Numeral. This was quite easy, but it gave her some confidence.
Next we did the first activity again with both children taking turns.
Diana was excited to get one she knew.
...and she knew right where to put it.
We had fun. Wesley got some good review and Diana got her first introduction to Roman Numerals.
Subscribe to:
Posts (Atom)